
Making the app look better, Exporting
Let’s make a fancier calculator.
Add a bitmap background
Godot is a video game engine, so it would be a pity not to have the program look nice. I like to add a background layer. I have been using the Sprite node for this, but the TextureRect is apparently made to do exactly what we want.
1. Use Inkscape or some other drawing program and create a .png file as above with a size of 1024×600 pixels. Here is one you can use.
2. Picking up from Lesson 1, add a TextureRect node by going to the Scene Dock, and add a child to the root node, Node2D.
3. Change the TextureRect texture property with the Inspector dock, and Load your background image as the texture.
4. Unlike the Sprite, the TextureRect has the ability to precisely fill itself. Turn on the Expand property. And, under Rect, change the Size to 1024×600. Last, make sure the Position of TextureRect is 0 for x and y. These will make sure that the bitmap background fills your app precisely.
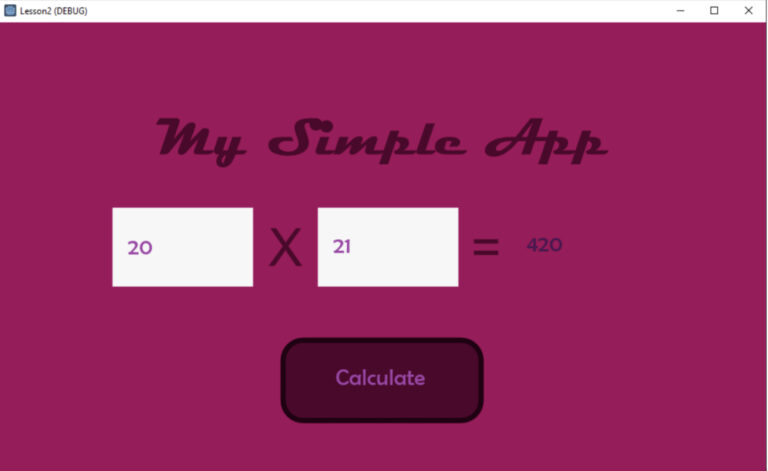
5. Where are your controls, like LineEdit, LineEdit2, etc.? They are probably hidden behind your new TextureRect node. If so, go to the Scene dock and right-click on TextureRect, and Move Up. I like to use Ctrl+arrow up. Move it until it is the top child under Node2D. That positions it behind everything else. Rearrange your controls to match the background. Here is my app at this point:
Add a better font
The default font is boring. We can add any font
6. Go to c:\Windows\Fonts. Find a font you like. Or, use the font I have provided for you (BRLNSR.TTF) in the Before folder. Copy it and paste it into your project folder. Godot should automatically import it into the project. You should see it in the lower left FileSystem area.
7. Click on LineEdit . Go to the Inspector dock and Click on Theme Overrides, then Fonts. Where it says [empty], use the dropdown menu and choose New Dynamic Font. Click on ‘TT Dynam’ (it will just have appeared with your last selection), and you should see a Font, Font Data entry that says [empty]. Use the dropdown menus there to select Load. Load the font you just added to the project in step 6.
8. You should see a Settings menu just above the selection you used to add your new font. Click that and change the Size. Also tick the Use Filter option. This will smooth the edges of your font, making look much nicer.
9. Also under Theme Overrides there is a Colors section. In that section you can change the Font Color. Click on the color box and move your mouse to pick a color. If you want the color to match everywhere you can copy the six character color number (e.g. “a543aa”) and paste it in the same place for each object you want to be that color.
Make controls transparent
10. An easy way to make nice looking controls (e.g. edit boxes, buttons, etc.) is to create their look in the drawing program as part of your background, then make your controls transparent. If you go to Custom Styles, you can choose New StyleBoxEmpty.
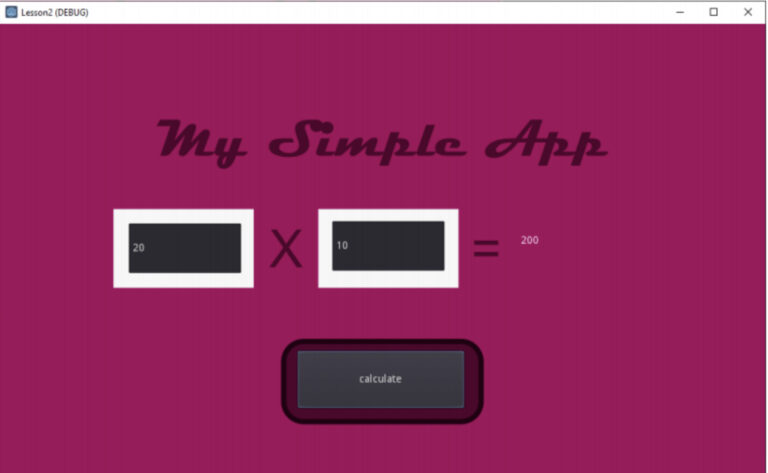
Here is my project at this point:
I could change all of the controls to match LineEdit by following the steps 6-10. But, another way is to Duplicate and Change Type. Ideally, I would have done steps 6-10 first for the first control and then Duplicated and Changed Type as I built the other controls. But it is not that difficult to do it now.
11. Click on LineEdit and right-click to Duplicate. You will get a LineEdit3. Duplicate this twice more to create LineEdit4 and LineEdit5.
12. All the actual controls LineEdit3, 4 and 5 are stacked up on top of each other. So, move them around so you can click each one. Click on LineEdit2, and right-click and Delete Node. Now position LineEdit3 where you like, in place of LineEdit2. Now rename LineEdit3 to LineEdit2.
13. Right-click on Label and Delete Node. Click on LineEdit4. Right-click and Change Type to Label. Rename LineEdit4 to Label.
14. Remove the last of the original controls, Button, using Delete Node. Change Type of LineEdit5 to Button. Rename it to Button.
15. The Change Type option is very useful, but it has limitations, as it can only keep the information that it has from one type of node to another. LineEdit does not have a ‘pressed’ signal, so we lost the link between pressing the button and running the code under func _on_Button_pressed(). To fix this, click on Button, then go to the Inspector dock and click the Node tab. Select ‘pressed()’ and right-click Connect. Choose the default, _on_Button_pressed. Your better-looking app should run fine now

Other, ways to improve the appearance of the UI.
Add tool tips
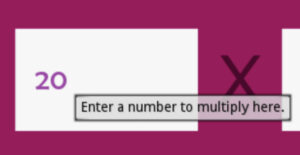
16. Godot makes it trivial to add tool-tips to a most of the node-types we have been using. Try clicking on LineEdit and go to the Inspector dock, find Hint, and then Tooltip. Enter some helpful text, like “Enter a number to multiply here.” When you run the app and hover the cursor over LineEdit, the tool-tip will appear.
How to let the user close the app with the Esc key.
Most apps are nice enough not to make me click the little X in the corner of the window to close them. Here’s a small bit of code that watches for the Esc key and then closes the app.
Including this here is a bit random, but anyway, I suggest you include this function in every app. It will allow you to close the app by using the Esc key.
17. Enter the following code:
					func _unhandled_input(event):
    if event is InputEventKey:
        if event.pressed and event.scancode == KEY_ESCAPE:
            get_tree().quit()
Explanation:
Godot can monitor all sorts of events like mouse clicks and keyboard keys and you can do various actions. Here we are just looking for the one key press, Esc, and then getting the whole ‘tree’ of the project and quitting.
Export html5 and Windows or Linux or MacOS .exe files
The most important feature is to create applications for other people to use. Godot can create several different versions of an app. The easiest are Windows, Linux and html5. MacOS requires an AppleID. The mobile-specific ones require the Software Development Kits for those environments and the instructions are more complex. I will explain how to do this for Windows and html5.
18. Choose Project, then Export. Click on Add. Pick Windows. If you have never done this, you will have to add the export templates for Godot. Godot will give some warning messages and tell you ‘export templates for this platform are missing: Manage Export Templates.’. Select Manage Export Templates and you should be asked if you want to download it and install it. The download is about 500MB.
When that is all done, you should see this (from Project, Export):
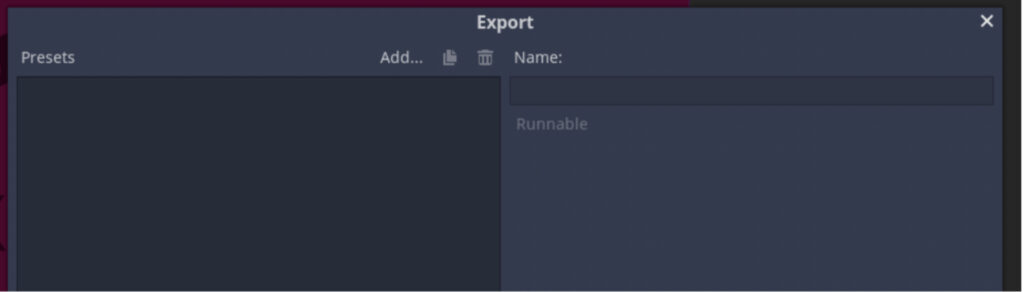
19. Click Add and select Windows (or MacOS or Linux, depending on your computer).
20. Change Export Path (top right) to the place you want your exported files. I like to put it under my project in a ‘Win10’ folder. Click Create Folder (upper right)
21. Type the name of the file. I like to name it my project name. So, I will enter ‘lesson2’. Godot will automatically add the ‘.exe’ file extension.
22. Click Export and you will be asked for the name of the file again, which should be lesson2. Also, you will see an option ‘Export with Debug’. I turn this off. Click Save. If you look in the Win10 folder you just created, you should find lesson2.exe and lesson2.pck. You should be able to run lesson2.exe and get your app.
23. Let’s do the export again for html5. Choose from the menu, Project, Export, and then Add html5.
24. Click on Export Path. You don’t want to combine your html5 files with your Win10 files, so go ‘up’ a level using the little up arrow next to the word ‘Path’ in the upper left corner.
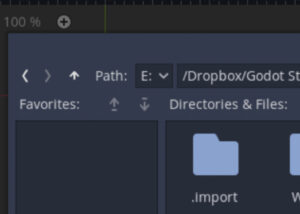
25. Now Create Folder for html5.
26. Annoyingly, this version of Godot keeps the .exe extension and wants to add html to that, so edit the File name at the bottom until it is simply ‘lesson2’, and click Save. Then click Export Project and Save. Check your new html5 folder.
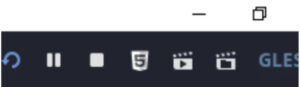
27. This is not an ordinary html5 file, like one you can make with a text editor. This file needs to be served by a server. If you double-click it, it won’t work. You can upload it to a web server and it will work there. But also, if you look in the top right of Godot, you will see a small icon that says ‘5’. Click that. Godot comes with a little server and which will serve your html5 version and present it in your default browser.
Note that older versions of Apple Safari may not work. So, use a new one with your Mac, or user Firefox, or Chrome. And, under iOS it also probably will not work because Apple has not really adopted the technologies used here.
More information on Exporting
Additional Tips:
The Project Manager occasionally loses all my projects. They are not gone and easily found again. Use the Scan function to have Godot look for project.godot files. When Godot finds these, it will import them into your project list again. Since I have all my projects under one folder, I just use Scan and point Godot at that folder.